http://oregonregency.blogspot.com/2010/03/2010-regency-bonnet-workshop.html
Stephanie Johanesen; bonnet enthusiast. :)
__________________________________________________
This is a little video I made to accompany the upcoming workshop. It's not exactly oscar-worthy, but it still serves a purpose. I say 'um' a lot and I also sound like I have no personality... but it still gets a point through. ::hee hee::
I hope this encourages you to go ahead and to make your own poke bonnet. :)
You can download the materials list by clicking the link provided below.
This bonnet was made using the same techniques described in the video.
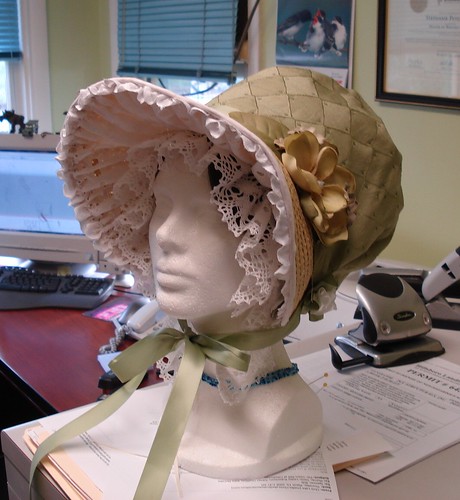
Tips that were left out of the video:
1) sew your ribbon ties on for additional strength.
2) I lined the inside to keep hair from getting caught in the straw.
3) How you cut your sun hat will determine what angle the brim will be at. So try it on and decide beforehand.
9 comments:
How fun :-)
Hi! I watched the video, and I want to make a bonnet for a class project in the next few days because these are amazingly cute. But I don't understand the last part! How is it that you sew a hotdog-folded piece of fabric at the short ends and then gather the edges? Where are you stringing the ribbon? Help! >.< Thank you! :)
Wait... after a lot of thinking I finally get what you mean. :) You sew it together so that the two seams will be together on the dome. You leave a space open at the "folded edge" to string the ribbon through the fold of the fabric- there is no seam-lined "pocket" for the ribbon. But is it better to sew the two short edges together to complete the dome shape? Or do you just leave this open? Thanks! :D This is a great tutorial!
I was wondering is there any reference to show what bonnets were in fashion when for the regency era? I'm having trouble deciding what styles to go for.
thanks for the directions...I made one to go with a Christmas costume and it turned out great! Wore it for 2 Church outreach teas and a Charles Dickens dinner this weekend! Blessings, Sharon Davis I'll send you a pic if you send me your email address. I'm at snallen2003@yahoo.com
This was a life saver, I helped with the costumes for my son's High School production of "A Christmas Carol". I have made over 6 so far and they totally make the outfit on the caroling girls. Each one is so fun to design!
Thanks!
I know I'm really late to commenting on this but thank you for sharing this how to information! I have one of these bonnets and have been thinking about making another for some time but haven't quite known how to do it until now. Thank you!
Is it possible to do this by hand sewing alone? Creating the ruffles looks hard...
Thanks
With the beige pin tuck bonnet with green ribbon ties. I’m curious how the compote was made three dimensional from a flat fabric with minimal gathering in the front. There does not appear to be a matching of the pin tuck pattern by connecting two pieces of fabric to achieve the affect. Of a three dimensional compote.
Post a Comment